API Tutorial
SectionsI. Introduction
Welcome to this tutorial on building a Golf Course Management React App using the Golfbert API and Google Maps! In this tutorial, we will walk through the process of creating a sample React application that displays course data and renders holes using Google Maps.
The sample app we will build has four tabs:
- First Request
- Course List
- Scorecard
- Holes
Overview of the Golfbert API
Golfbert is a powerful golf GPS API that provides access to a wide range of golf course data,including course details, scorecards, and hole information. By leveraging Golfbert API, we cancreate a seamless experience for users looking to manage their golf courses, keep scores, andnavigate holes with ease.
Overview of the React App with Google Maps
We will build a React app that fetches and displays data from the Golfbert API and integratesGoogle Maps to render the locations of holes on the selected golf course. The app will have aresponsive design and provide a seamless user experience across various devices.
App Functionality and Features
- Make API requests to Golfbert and display course data
- Search and filter golf courses
- Show scorecards with basic scorekeeping functionality
- Render hole locations on Google Maps with navigation
Prerequisites
Before starting this tutorial, make sure you have the following:
- Basic knowledge of JavaScript, React, and Google Maps API
- Node.js and npm installed on your system
- A valid Google Maps API key
- A Golfbert API key
With these prerequisites in place, let's get started on building our Golf Course Management ReactApp!
II. Setting up the development environment
In this section, we will set up our development environment for the Golf Course Management ReactApp. We will create a new React project, install necessary packages, and configure the GoogleMaps and Golfbert API keys.
A. Create a new React project using Create React App
To begin, open your terminal and run the following command to create a new React project usingCreate React App:
npx create-react-app golf-course-management
Once the project is created, navigate to the project folder:
cd golf-course-management
B. Install necessary packages
Next, we will install the necessary packages for our project. We will need Axios for API requests,React Tabs for the tabbed interface, and React Google Maps for rendering maps.
Run the following commands to install these packages:
npm install axios
npm install react-tabs
npm install @react-google-maps/api
npm install aws4
npm install isomorphic-unfetch
npm install querystring
C. Update the App component
Now that we have all the required packages installed, let's update the src/App.js file to match theprovided App component:
Import the necessary components and styles:
import React from 'react';
import './Style/App.css';
import { Tab, Tabs, TabList, TabPanel } from 'react-tabs';
import 'react-tabs/style/react-tabs.css';
import Courses from './Pages/Courses';
import Scorecard from './Pages/Scorecard';
import Hole from './Pages/Hole';
Replace the existing App component with the provided one:
function App() {
    return (
        <div className="App">
            <Tabs style={{ paddingTop: 25 }}>
                <TabList>
                    <Tab>First Request</Tab>
                </TabList>

                <TabPanel>
                    <p>healthy</p>
                </TabPanel>
            </Tabs>
        </div>
    );
}

export default App;
With the development environment set up, we can now proceed to build our Golf CourseManagement React App.
III. Creating the Golfbert Class
In this section, we will walk you through the process of creating the Golfbert class from scratch.The Golfbert class is designed to facilitate communication with the Golfbert API by utilizing theprovided AWS keys and API key.
A. Initialize the Class and Constructor
Create a new folder named lib inside the src directory. Then, create a new file named Golfbert.js inside the lib folder.
Start by importing the necessary libraries at the top of the file:
import aws4 from 'aws4';
import fetch from 'isomorphic-unfetch';
import querystring from 'querystring';
Next, create the Golfbert class and initialize the constructor. The constructor should accept aconfiguration object that contains the API key, AWS access key, AWS secret key, API host, and AWSregion:
class Golfbert {
    constructor(config) {
        this.apiKey = config.apiKey;
        this.accessKey = config.accessKey;
        this.secretKey = config.secretKey;
        this.host = 'api.golfbert.com';
        this.region = config.region || 'us-east-1';
    }
}
B. Implement the Request Method
Add a request() method to the Golfbert class. This method is responsible for making APIrequests to the Golfbert API. It should take an options object as an argument that includes detailslike the HTTP method, path, and any additional headers. Use the aws4.sign() method to sign therequest using the provided AWS keys and the fetch() method to make the request:
request(options) {
    const url = `https://${this.host}${options.path}`;
    const config = aws4.sign(
        {
            ...options,
            service: 'execute-api',
            region: this.region,
            host: this.host,
            headers: {
                'Content-Type': 'application/x-www-form-urlencoded',
                'x-api-key': this.apiKey,
            },
        },
        {
            accessKeyId: this.accessKey,
            secretAccessKey: this.secretKey,
        }
    );

    return fetch(url, config).then((res) => {
        if (res.ok) {
            return res.json();
        }

        const error = new Error(res.statusText);
        error.response = res;

        throw error;
    });
}
C. Add a Status Method
As an example of how to use the request() method, add a status() method to the Golfbert class.This method sends a GET request to the /status endpoint of the Golfbert API:
status() {
    return this.request({
        method: 'GET',
        path: `/status`,
    });
}
D. Export the Class
Finally, export the Golfbert class at the end of the file so it can be used in other parts of yourproject:
export default Golfbert;
Now that you have created the Golfbert class, you can use it in your project to simplify interactionswith the Golfbert API. Just import the class in the components where you need to make API callsand initialize a new instance with your API key, AWS access key, and AWS secret key.
IV. Building the App - First Request
In this section, we will build the main components of our Golf Course Management React App,starting with the First Request tab.
A. First Request
The First Request tab will demonstrate how to make a basic API request to the Golfbert API usingthe provided Golfbert class and display the response data. We will create a new FirstRequestcomponent and incorporate it into our App component.
Integrating the Golfbert class into the project: Create a new folder named lib inside the srcdirectory. Then, create a new file named Golfbert.js inside the lib folder and add the providedGolfbert class code.
Creating the FirstRequest component:
Create a new folder named Pages inside the src directory, if it doesn't already exist. Then, createa new file named FirstRequest.js inside the Pages folder and add the following code:
import React, { useState, useEffect } from 'react';
import Golfbert from '../lib/Golfbert';

const FirstRequest = () => {
    const [data, setData] = useState(null);
    useEffect(() => {
        const fetchData = async () => {
            try {
                const golfbert = new Golfbert({
                    apiKey: 'your_golfbert_api_key',
                    accessKey: 'your_aws_access_key',
                    secretKey: 'your_aws_secret_key',
                });
                const response = await golfbert.status();
                setData(response);
            } catch (error) {
                console.error('Error fetching data:', error);
            }
        };

        fetchData();
    }, []);

    return (
        <div>
            <h2>First Request</h2>
                {data ? (
                    <pre>{JSON.stringify(data, null, 2)}</pre>
                ) : (
                    <p>Loading data...</p>
                )}
        </div>
    );
};

export default FirstRequest;
Make sure to replace your_golfbert_api_key, your_aws_access_key, and your_aws_secret_keywith your actual Golfbert API key, AWS access key, and AWS secret key.
Integrating the FirstRequest component into the App component: Open the src/App.js file andimport the FirstRequest component at the top:
import FirstRequest from './Pages/FirstRequest';
Then, replace the <p>healthy</p> line inside the first <TabPanel> with the <FirstRequest /> component:
<TabPanel>
    <FirstRequest />
</TabPanel>
Now, when you run the app and navigate to the First Request tab, it should display the data fetchedfrom the Golfbert API using the Golfbert class. If there are any issues, the console will display anerror message.

V. Implementing the Course List Component
In this section, we will walk through the process of building the Course component, which isresponsible for fetching and displaying course data from the Golfbert API.
A. Import Dependencies and Initialize the Component
Start by importing the necessary dependencies at the top of the file, such as React, useEffect, andthe Golfbert class:
import React, { useEffect } from 'react';
import Golfbert from '../lib/Golfbert';
Next, initialize the Course functional component:
function Course(props) {
    // ...
}
B. Manage State with React Hooks
Use the useState hook to manage the state of the component. Declare two state variables:searchText for the search input value, and courses to store the fetched course data:
let [searchText, setSearchText] = React.useState('');
let [courses, setCourses] = React.useState([]);
C. Fetch Course Data
Use the useEffect hook to fetch course data when the component mounts:
useEffect(() => {
    getCourses();
}, []);
Define the getCourses function, which initializes a new Golfbert instance and calls the getCourses()method with the search parameters:
const getCourses = () => {
    const golfbert = new Golfbert({
        apiKey: 'your_golfbert_api_key',
        accessKey: 'your_aws_access_key',
        secretKey: 'your_aws_secret_key',
    });

    golfbert
        .getCourses({ name: searchText, limit: 10, offset: 0 })
        .then((data) => {
            setCourses(data.resources);
        })
        .catch((err) => console.error(err));
    };
Remember to replace 'your_golfbert_api_key', 'your_aws_access_key', and 'your_aws_secret_key' with your actual keys.
D. Render the Component
Render the search input, search button, and course data in a table:
return (
    <div className="course" style={{ margin: '25px' }}>
        <div style={{ margin: '25px' }}>
            <input
                type="search"
                placeholder="Search"
                value={searchText}
                onChange={(e) => setSearchText(e.currentTarget.value)}
            />
            <button onClick={getCourses}>Search</button>
        </div>
        <table id="courses">
            <thead>
                <tr>
                    <th>id</th>
                    <th>Course Name</th>
                    <th>Phone Number</th>
                    <th>Street</th>
                    <th>City</th>
                    <th>State</th>
                    <th>Zip</th>
                    <th>Country</th>
                    <th>lat</th>
                    <th>long</th>
                </tr>
            </thead>
            <tbody>
                {courses.map((course, index) => (
                    <tr key={index}>
                        <td>{course.id}</td>
                        <td>{course.name}</td>
                        <td>{course.phonenumber}</td>
                        <td>{course.address.street}</td>
                        <td>{course.address.city}</td>
                        <td>{course.address.state}</td>
                        <td>{course.address.zip}</td>
                        <td>{course.address.country}</td>
                        <td>{course.coordinates.lat}</td>
                        <td>{course.coordinates.long}</td>
                    </tr>
                ))}
            </tbody>
        </table>
    </div>
E. Adding the getCourses Method to the Golfbert Class
Before we can use the getCourses method in our Course component, we need to add it to theGolfbert class. Open the Golfbert.js file and add the following method to the class:
getCourses(options) {
    const qs = options ? '?' + querystring.stringify(options) : '';

    return this.request({
        method: 'GET',
        path: `/v1/courses${qs}`
    });
}
This method accepts a params object containing query parameters for the API request, such as thecourse name, limit, and offset. It then converts the parameters into a query string and sends a GET request to the /courses endpoint.
F. Integrating the Course Component into the Main App
Now that we have implemented the Course component, it's time to integrate it into the main Appcomponent. Replace the Courses import statement in the App.js file with the new Coursecomponent:
import Course from './Pages/Course';
Then, update the corresponding <TabPanel> to render the Course component instead of theCourses component:
<TabPanel>
    <Course />
</TabPanel>
G. Testing the Application
At this point, your application should be fully functional. To test it, start your development serverwith npm start or yarn start, and open your browser to http://localhost:3000. You shouldsee the application with four tabs: "First Request," "Course List," "Scorecard," and "Hole."
Click on the "Course List" tab, and you should see a search input and a "Search" button. Enter acourse name or leave the input blank to fetch all courses, and click the "Search" button. Thefetched course data should appear in a table below the search input.
Now that you have successfully built a sample React app that integrates with the Golfbert API and displays course data, you can continue to expand your application by implementing the"Scorecard" and "Hole" tabs, utilizing additional Golfbert API endpoints, and adding more featuresto create a comprehensive golf application.

VI. Building The Scorecard Component
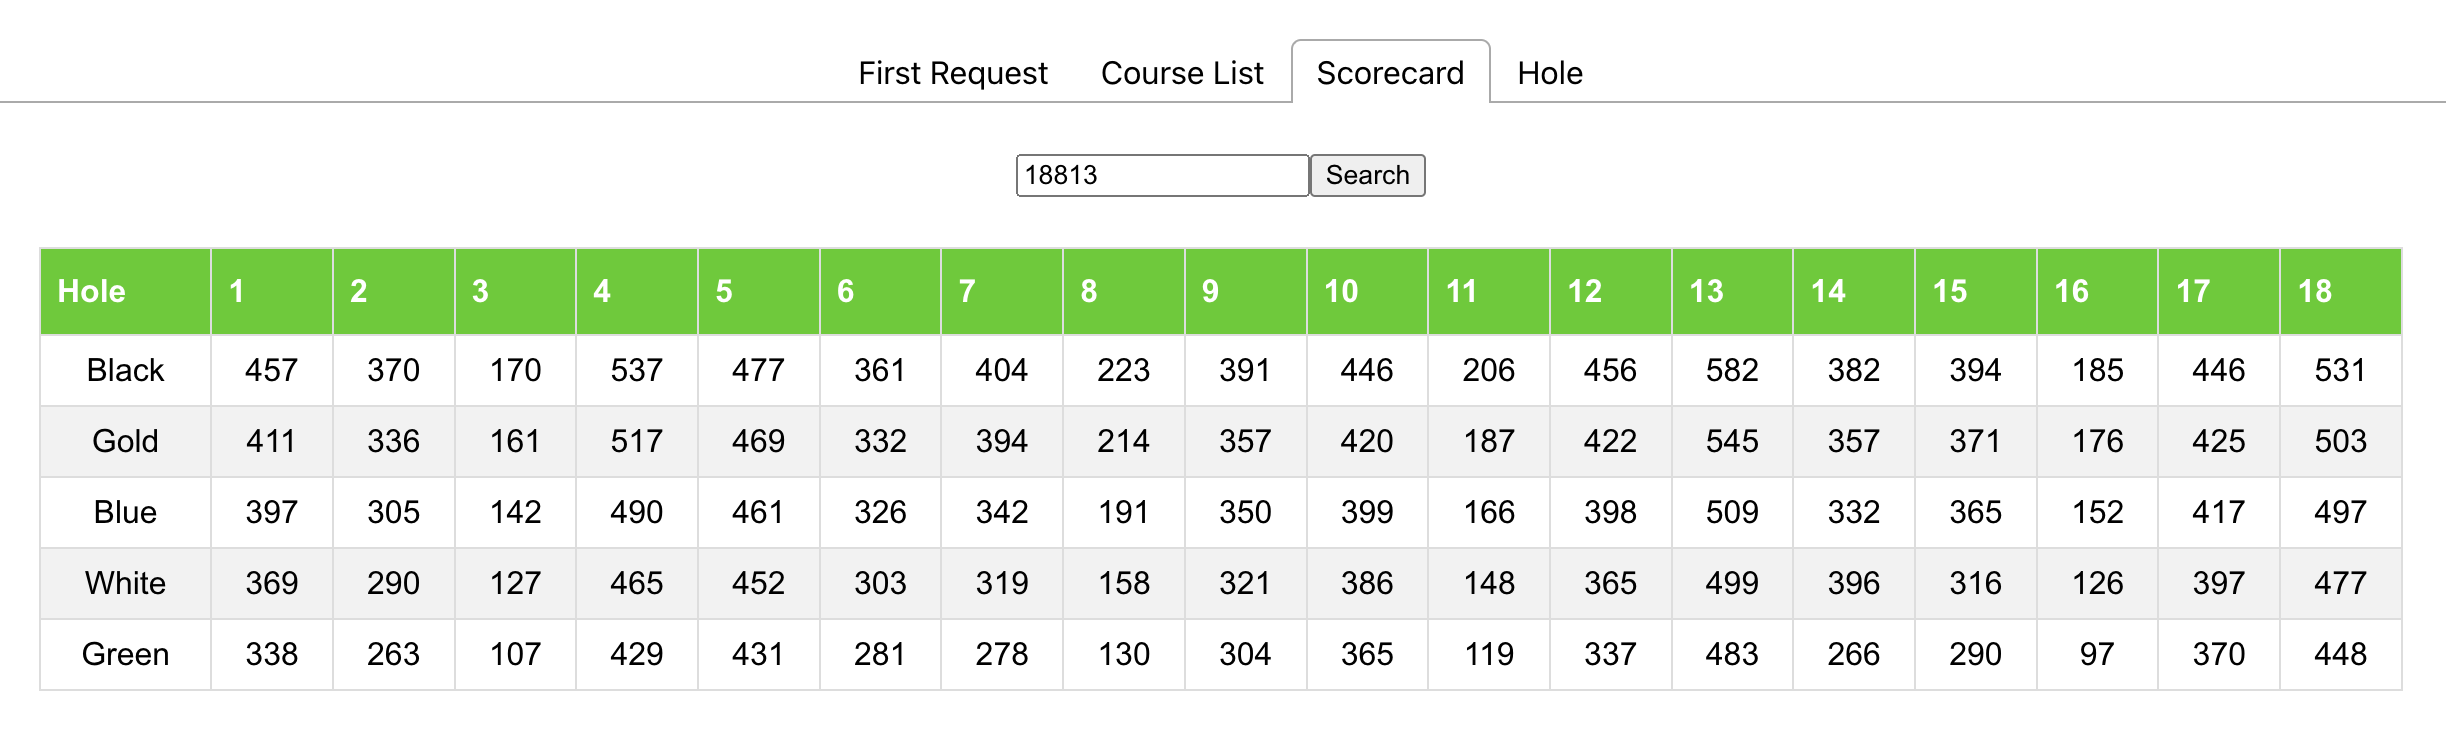
In this tutorial section, we will walk you through the creation of a Scorecard component step bystep. This component displays a golf course scorecard, including the hole distances for differenttee box colors. We will use the Golfbert library to fetch course data.
Step 1: Add getCourseScorecardById method to Golfbert class
Before proceeding with the creation of the Scorecard component, you'll need to add a new methodto the Golfbert class in the lib/Golfbert.js file. This method is used to fetch the coursescorecard by ID.
Open the lib/Golfbert.js file and add the following method to the Golfbert class:
getCourseScorecardById(id) {
    return this.request({
        method: 'GET',
        path: `/v1/courses/${id}/scorecard`
    });
}
Now that you've added the getCourseScorecardById method to the Golfbert class, you canproceed with creating the Scorecard component.
Step 2: Create a new file and import necessary libraries and components
First, create a new file named Scorecard.js inside the Pages directory of your project.
Next, import the required libraries and components at the beginning of the Scorecard.js file:
import React, { useEffect } from 'react';
import Golfbert from '../lib/Golfbert';
Step 3: Create the Scorecard function component
Define a new function component named Scorecard that takes props as its argument:
function Scorecard(props) {
    // ...
}
Step 4: Initialize state
Inside the Scorecard component, initialize the state using React.useState for searchText, courses,teeboxColors, and scorecard:
let [searchText, setSearchText] = React.useState(18813);
let [courses, setCourses] = React.useState([]);
let [teeboxColors, setTeeboxColors] = React.useState([]);
const holes = Array.from({ length: 18 }, (_, index) => index + 1);
let [scorecard, setScorecard] = React.useState([]);
Step 5: Fetch courses on page load
Use the useEffect hook to call the getCourses function when the component mounts:
useEffect(() => {
    getCourses();
}, []);
Step 6: Define the getCourses function
Create a function named getCourses that fetches the course scorecard by ID using the Golfbertlibrary:
const getCourses = () => {
    // ...
}
Inside this function, create a new instance of Golfbert with your API key, access key, and secret key.Call the getCourseScorecardById method with the searchText state as an argument. Then, processthe received data to extract unique tee box colors and create the scorecard array. Finally, updatethe teeboxColors and scorecard state variables:
setTeeboxColors([]);
setScorecard([]);
const golfbert = new Golfbert({
    apiKey: 'your_api_key',
    accessKey: 'your_access_key',
    secretKey: 'your_secret_key',
});
golfbert
.getCourseScorecardById(searchText)
.then((data) => {
    console.log(data)

    // Get colors
    let colors = data.holeteeboxes.map((teebox) => { return teebox.color; })
    const uniqueColors = [...new Set(Object.values(colors))];

    setTeeboxColors(uniqueColors);

    // Get scorecard
    let scorecard = data.holeteeboxes
        .map((hole) => {
            return hole
        })
        .sort((a, b) => a.holenumber - b.holenumber)

    setScorecard(scorecard);
})
.catch((err) => console.error(err));
Step 7: Define the getHoleDistance function
Create a function named getHoleDistance that takes color and holeNumber as its arguments. Thisfunction returns the distance of a hole based on the provided tee box color and hole number:
// function to get hole distance based on color and hole number
const getHoleDistance = (color, holeNumber) => {
    const matchingHoles = scorecard.filter(hole => hole.color === color && hole.holenumb

    if (matchingHoles.length === 0) {
        // no holes match the given color and hole number
        return '-';
    } else {
        // only one hole matches the given color and hole number
        return matchingHoles[0].length;
        }
    }
Step 8: Return the JSX for the Scorecard component
In the return statement of the Scorecard component, render a search input field, a search button,and a table to display the course scorecard:
return (
    <div className="course" style={{margin: '25px'}}>
        <div style={{margin: '25px'}}>
            <input type="search" placeholder="Course Id" value={searchText} onChange={ e =
            <button onClick={getCourses}>Search</button>
        </div>
        <table id="courses">
            <thead>
                <tr>
                    <th>Hole</th>
                    {holes.map(hole => (
                        <th key={hole}>{hole}</th>
                    ))}
                </tr>
            </thead>
            <tbody>
                {teeboxColors.map(color => (
                    <tr key={color}>
                        <td>{color}</td>
                        {holes.map(hole => (
                            <td key={hole}>{getHoleDistance(color, hole)}</td>
                        ))}
                    </tr>
                ))}
            </tbody>
        </table>
    </div>
);
Step 9: Export the Scorecard component
Export the Scorecard component so it can be used in other parts of your application:
export default Scorecard;
With these steps, you have successfully created a Scorecard.
Step 10: Import and display the Scorecard component in App.js
Now that you've created the Scorecard component, you need to import it into your App.js fileand display it inside a TabPanel.
Open the App.js file and add the following import statement at the beginning of the file:
import Scorecard from './pages/Scorecard';
Next, find the place where you want to display the Scorecard component and add it inside a TabPanel:
    <TabPanel>
        <Scorecard />
    </TabPanel>
With these changes, your Scorecard component will be displayed inside the specified TabPanel inyour application.
VII. Create the Hole Map Component
In this tutorial section, we will walk you through the creation of the Hole component in a Reactapplication. This component is designed to fetch and display golf course hole data using theGolfbert library. We will go through each step of the code and explain the functionality of thecomponent.
Import the necessary libraries and components:
import React, { useEffect } from 'react';
import Golfbert from '../lib/Golfbert';
import HoleMap from './HoleMap';
We import React, along with the useEffect hook, the Golfbert library, and the HoleMap component.
Define the Hole component:
function Hole (props) {
    ...
}
The Hole component is a functional component that receives props as its argument.
Set up the component state:
let [searchText, setSearchText] = React.useState(18813);
let [holes, setHoles] = React.useState([]);
let [polygons, setPolygons] = React.useState({});
We set up three state variables: searchText, holes, and polygons. searchText stores the user's inputfor the course ID, holes stores the fetched hole data, and polygons stores the polygons for each hole.
Create a Golfbert instance:
const golfbert = new Golfbert({
    apiKey: 'YOUR_GOLFBERT_API_KEY',
    accessKey: 'YOUR_GOLFBERT_ACCESS_KEY',
    secretKey: 'YOUR_GOLFBERT_SECRET_KEY'
});
We create a new Golfbert instance with the required API keys and credentials.
Fetch hole data on component mount:
useEffect(() => {
    getHoles();
}, []);
We use the useEffect hook to fetch hole data when the component mounts by calling the getHolesfunction.
Define the getPolygons function:
const getPolygons = (holeId) => {
    golfbert
        .getHolePolygonsById(holeId)
        .then((data) => {
            const allPolygons = data.resources.map((resource) => ({
                surfaceType: resource.surfacetype,
                points: resource.polygon
            }));
            setPolygons((prevState) => ({
                ...prevState,
                [holeId]: allPolygons
            }));
        })
    .catch((err) => console.error(err));
};
The getPolygons function fetches polygons for a specific hole ID, processes the data, and updatesthe polygons state.
Define the getHoles function:
const getHoles = () => {
    setHoles([]);
    golfbert
        .getCourseHolesById(searchText)
        .then((data) => {
            setHoles(data.resources);
            data.resources.forEach((hole) => getPolygons(hole.id));
        })
        .catch((err) => console.error(err));
}
The getHoles function fetches hole data for the course ID specified in searchText, updates theholes state, and calls getPolygons for each hole.
Render the component:
return (
<div className="course" style={{margin: '25px'}}>
<div style={{margin: '25px'}}>
<input type="search" placeholder="Course Id" value={searchText} onChange={ e =
<button onClick={getHoles}>Search</button>
</div>
{holes.map((hole) => {
return (
<div key={hole.id} style={{margin: '25px', display: 'flex'}}>
<div style={{flexGrow: 1, textAlign: 'left'}}>
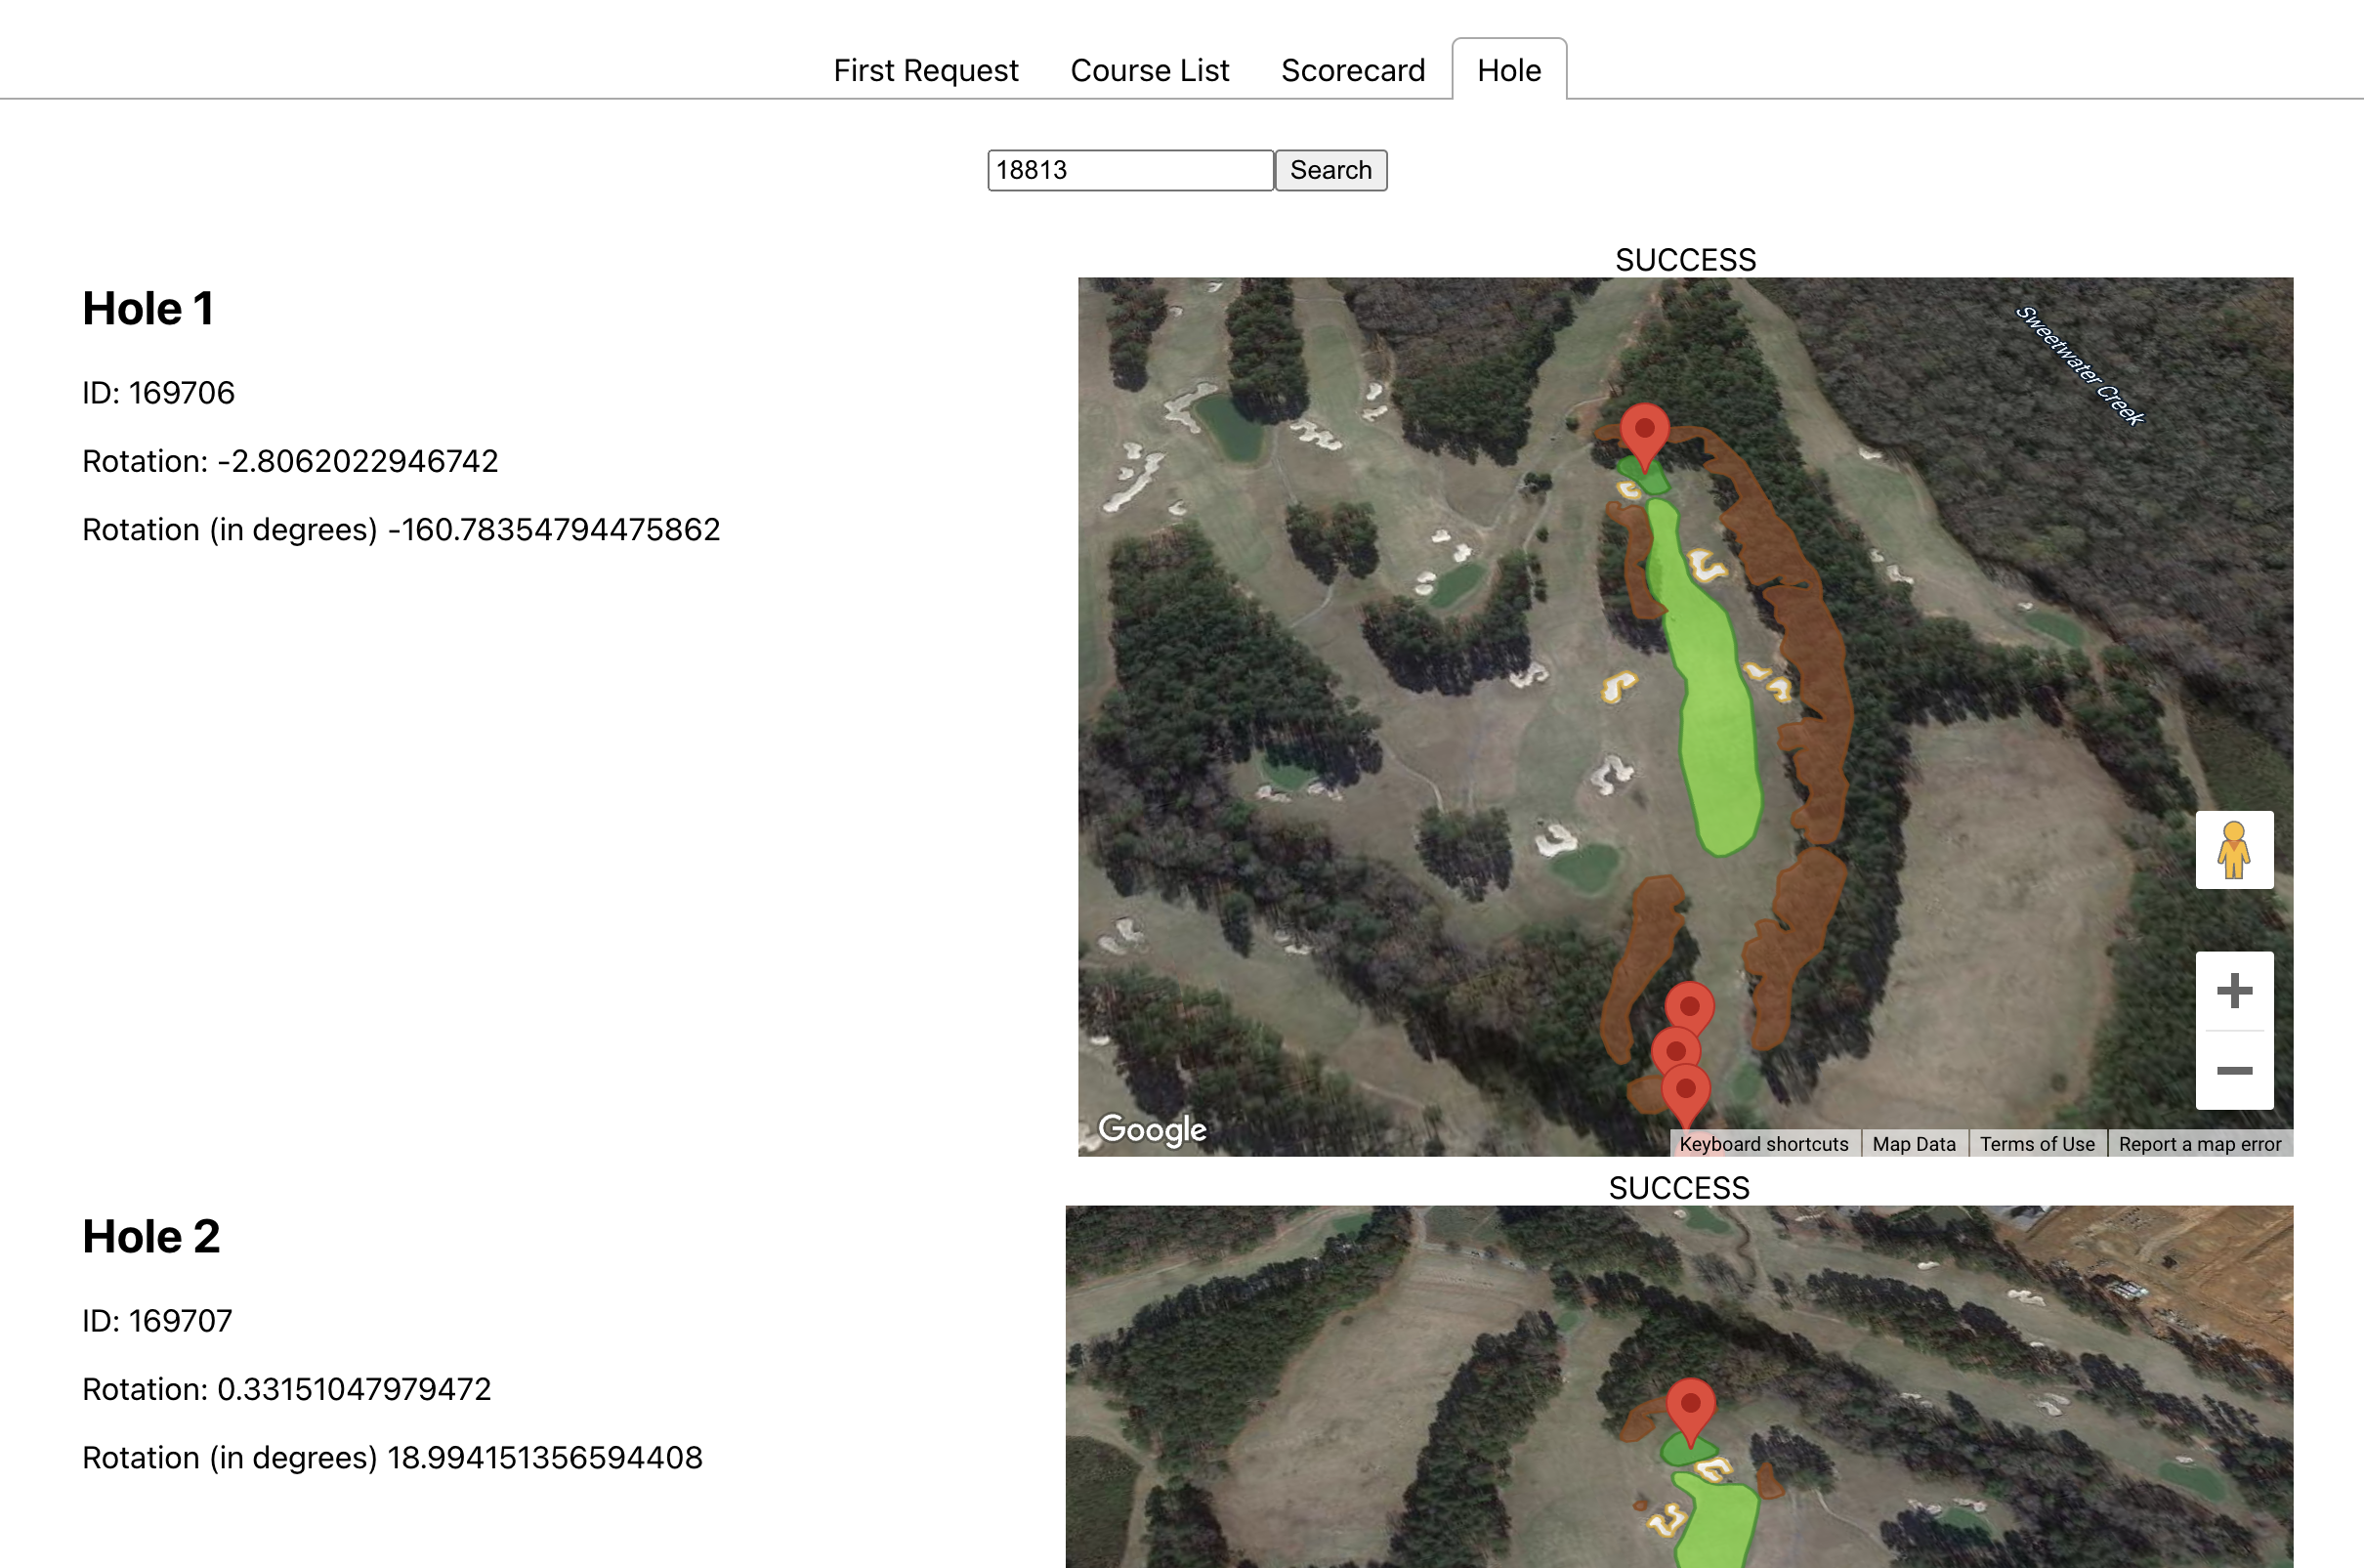
<h2>Hole {hole.number}</h2>
<p>ID: {hole.id}</p>>
<p>Rotation: {hole.rotation}</p>
<p>Rotation (in degrees) {hole.rotation * 180 / Math.PI}</p>
</div>
<div style={{flexGrow: 3}}>
<HoleMap hole={hole} polygons={polygons[hole.id]} />
</div>
</div>
)
})
}
</div>
);
Export the Hole component:
export default Hole;
Finally, we export the Hole component so it can be used in other parts of the application.
With these steps, we have successfully created the Hole component that fetches and displays golfcourse hole data using the Golfbert library. Users can search for golf courses using the providedinput field and view the details of each hole, along with a visual representation of the hole layout.
Now we will break down the process of creating the HoleMap component. This component isresponsible for rendering the map of the golf course hole along with its polygons.
Create a file in the Pages folder names HoleMap.js
Import the required libraries and components:
import React, { useEffect, useRef, ReactElement, useState } from "react";
import ReactDOM from "react-dom";
import {Loader, LoaderOptions} from '@googlemaps/js-api-loader';
Define the Wrapper component:
const Wrapper = ({
    children,
    render,
    callback,
    ...options
}) => {
    const [status, setStatus] = useState('LOADING');
    useEffect(() => {
        const loader = new Loader(options);

        const setStatusAndExecuteCallback = (status) => {
            if (callback) callback(status, loader);
            setStatus(status);
        };

        setStatusAndExecuteCallback('LOADING');

        loader.load().then(
            () => setStatusAndExecuteCallback('SUCCESS'),
            () => setStatusAndExecuteCallback('FAILURE') );
        }, []);

        if (status === 'SUCCESS' && children) return <>{status}{children};

        if (render) return render(status);

        return <>;
    };
The Wrapper component helps manage the Google Maps API loading process. It takes in children,render, callback, and options as props. The component tracks the loading status of the API andupdates the status accordingly. Once the API is loaded, the children components are rendered.
Define the findCenter function:
function findCenter(coords1, coords2) {
    const x = (coords1.lng + coords2.lng) / 2;
    const y = (coords1.lat + coords2.lat) / 2;

    return {
        lat: y,
        lng: x
    };
}
The findCenter function calculates the center point between two sets of coordinates.
Create the MyMapComponent component:
function MyMapComponent({ center, zoom, rotation, id, vectors, hole, polygons }) {
    const ref = useRef(null);
    const [map, setMap] = useState();

    console.log('polys', polygons)

    let flagstick = {
        lat: hole.flagcoords.lat,
        lng: hole.flagcoords.long,
    }

    let minCoords = {
        lat: hole.range.y.min,
        lng: hole.range.x.min,
    }

    let holeCenter = findCenter(flagstick, minCoords);

    let newVectors = rotatePointsAroundFarthest(vectors.filter(i => i.type !== 'Flag'),
MyMapComponent is a functional component that takes center, zoom, rotation, id, vectors, hole, andpolygons as props. It uses a ref to create a map container and a map state to store the created mapinstance. The component calculates the flagstick position and hole center using the provided data.
Define the drawPolygons function:
const drawPolygons = (map, polygons) => {
    polygons.forEach((polygon) => {
        const path = polygon.points.map((point) => ({
            lat: point.lat,
            lng: point.long,
        }));

        const polygonStyle = getPolygonStyle(polygon.surfaceType);

        const newPolygon = new window.google.maps.Polygon({
            paths: path,
            strokeColor: polygonStyle.strokeColor,
            strokeOpacity: polygonStyle.strokeOpacity,
            strokeWeight: 2,
            fillColor: polygonStyle.fillColor,
            fillOpacity: polygonStyle.fillOpacity,
        });

        newPolygon.setMap(map);
    });
};

useEffect(() => {
    if (ref.current && !map && polygons) {
        const newMap = new window.google.maps.Map(ref.current, {
            zoom,
            center: holeCenter,
            mapId: `90f87356969d889c`,
            mapTypeId: "hybrid",
            scaleControl: false,
            mapTypeControl: false,
            panControl: false,
            zoomControl: true,
            rotateControl: false,
            fullscreenControl: false,
            heading: rotation * 180 / Math.PI,
            tilt: 45,
        })

        new window.google.maps.Marker({
            position: flagstick,
            rotation: rotation * 180 / Math.PI,
            map: newMap, title: 'Flag',
        });

        newVectors.forEach((marker) => {
            new window.google.maps.Marker({
                position: {
                    lat: marker.lat,
                    lng: marker.long,
                },
                rotation: rotation * 180 / Math.PI,
                map: newMap, title: marker.title,
            });
        });

        if (polygons) {
            drawPolygons(newMap, polygons)
        }

        console.log(newMap.getHeading())
        setMap(newMap);
    }
}, [id, ref, map, center, zoom, rotation, polygons]);

return <div ref={ref} style={{ flexGrow: "1", height: "100%" }} />;
}
In the useEffect hook, the component initializes the Google Maps instance with the providedconfigurations and adds markers for the flagstick and other vectors. If polygons are available, itcalls the drawPolygons function to draw the polygons on the map.
Define the getPolygonStyle function:
const getPolygonStyle = (surfaceType) => {
    switch (surfaceType) {
        case "Green":
            return {
                strokeColor: "#008000",
                fillColor: "#32CD32",
                strokeOpacity: 0.8,
                fillOpacity: 0.6,
            };
        case "Fairway":
            return {
                strokeColor: "#228B22",
                fillColor: "#7CFC00",
                strokeOpacity: 0.8,
                fillOpacity: 0.6,
            };
        case "Sand":
            return {
                strokeColor: "#DAA520",
                fillColor: "#FFFF",
                strokeOpacity: 0.8,
                fillOpacity: 0.6,
            };
        case "Woods":
            return {
                strokeColor: "#8B4513",
                fillColor: "#A0522D",
                strokeOpacity: 0.8,
                fillOpacity: 0.6,
            };
        case "Water":
            return {
                strokeColor: "#0000FF",
                fillColor: "#1E90FF",
                strokeOpacity: 0.8,
                fillOpacity: 0.6,
            };
        default:
            return {
                strokeColor: "#FF0000",
                fillColor: "#FF0000",
                strokeOpacity: 0.8,
                fillOpacity: 0.6,
            };
    }
};
The getPolygonStyle function returns the styling for polygons based on their surface type.
Implement the HoleMap component:
export default function HoleMap(props) {
    const { hole, polygons } = props;

    const center = { lat: hole.flagcoords.lat, lng: hole.flagcoords.long };
    const zoom = 17;
    return (
        <div style={{ height : '450px', width: '100%' }}>
            <Wrapper apiKey="YOUR_GOOGLE_API_KEY" render={render}>
                <MyMapComponent
                    id={hole.id}
                    center={center}
                    zoom={zoom}
                    rotation={hole.rotation}
                    vectors={hole.vectors}
                    hole={hole}
                    polygons={polygons}
                />
            </Wrapper>
        </div>
    );
}
The HoleMap component sets the center and zoom values for the map and wraps theMyMapComponent inside the Wrapper component. The Wrapper component is responsible forloading the Google Maps JavaScript API.
Implement the rotatePointsAroundFarthest function:
function rotatePointsAroundFarthest(points, flagCoords, angle) {
    // Calculate the distance between each GPS point and the flag coordinates
    const distances = points.map(point => {
        const lat1 = flagCoords.lat;
        const lon1 = flagCoords.lng;
        const lat2 = point.lat;
        const lon2 = point.long;
        const R = 6371; // Earth's radius in km
        const dLat = (lat2 - lat1) * Math.PI / 180;
        const dLon = (lon2 - lon1) * Math.PI / 180;
        const a = Math.sin(dLat/2) * Math.sin(dLat/2) + Math.cos(lat1 * Math.PI / 180) * Math.cos(lat2 * Math.PI / 180) * Math.sin(dLon/2) * Math.sin(dLon/2);
        const c = 2 * Math.atan2(Math.sqrt(a), Math.sqrt(1-a));
        const d = R * c; // Distance in km
        return d;
    });

    // Find the GPS point with the maximum distance from the flag coordinates
    const farthestIndex = distances.indexOf(Math.max(...distances));
    const farthestPoint = points[farthestIndex];
    // Rotate the remaining GPS points around the farthest point
    const rotatedPoints = points.map((point, index) => {
        if (index === farthestIndex) return point;
        // Skip the farthest point //console.log(point, farthestPoint, angle)
        return rotatePointByPoint(point, farthestPoint, angle);
    });
    // Return the rotated GPS points
    return rotatedPoints;
}
The rotatePointsAroundFarthest function calculates the distance between each GPS point and theflag coordinates, finds the farthest GPS point, and rotates the remaining GPS points around thefarthest point.
Implement the rotatePointByPoint function:
function rotatePointByPoint(point, rotationPoint, angle) {
    // Convert the angle from degrees to radians
    const radians = angle * Math.PI / 180;

    // Calculate the coordinates of the point relative to the rotation point
    const relativeX = point.long - rotationPoint.long;
    const relativeY = point.lat - rotationPoint.lat;

    // Apply the rotation matrix to the point
    const rotatedX = relativeX * Math.cos(radians) - relativeY * Math.sin(radians);
    const rotatedY = relativeX * Math.sin(radians) + relativeY * Math.cos(radians);

    // Translate the point back to its original position by adding the coordinates of the rotation point
    const x = rotatedX + rotationPoint.long;
    const y = rotatedY + rotationPoint.lat;

    // Return the rotated point
    return {
        type: point.type,
        lat: y,
        long: x
    };
}
The rotatePointByPoint function rotates a given point around another point (the rotation point) by aspecified angle. This function is used by the rotatePointsAroundFarthest function to perform therotation for each point.
With all the functions and components in place, the HoleMap component is complete. When usedin an application, it will display a map with custom markers and polygons based on the dataprovided through the hole and polygons props.
To add the Hole component to your App.js file, you need to first import the Hole component andthen include it within a TabPanel. Here's an example of how you can do this:
Import the Hole component at the top of your App.js file:
import React from 'react';
import { Tab, Tabs, TabList, TabPanel } from 'react-tabs';
import 'react-tabs/style/react-tabs.css';
import Hole from './components/Hole';

function App() {
    return (
        ...
            <TabPanel>
                <Hole />
            </TabPanel>
        ...
    );
}

export default App;
This will add the Hole component to your application inside a TabPanel. When you click on the"Hole Component" tab, the Hole component will be displayed.